• Source: Selena Gomez in The Dead Don't Die
The twisting was really hard to deal with.
 Technically there isn't any visible expanding, but I trust we all know they aren't actually that big.
The twisting was really hard to deal with.
Although not as in depth as the others, I've made a walkthrough on how I do shadows. It's available for download.
It's really more of an explanation or showcase of how I set one up, but does an OK job of getting the point across. While I was working on a static image that had animations added, it's the same idea for working with video*.
That little asterisk is pretty important though: If you're going to work on video, you will need to rotoscope the shadow matte layer (it controls where the shadow is allowed to be) and that can be time consuming.
For clarity:
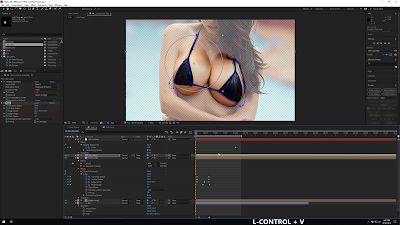
The "Set Matte" effect here is the really important piece. That effect will force the solid layers to only show up where the breast is cutout. By then adding on a blur, it would basically look like a giant Outer Glow on the breast. Since shadows don't do that, there's a Mask on the layer, which further limits the size of the shadow. At the bottom of the pile of effects there is a second Set Matte that does something similar, except it keeps the shadow from going off her body.
That does mean you could just not use a mask and rely solely on that second Set Matte effect, but I like a bit more control.
 I made a walkthrough for how to use the new Extra Bounce script/expression in the Jiggle and Grow Script. The tutorial is 8.5 minutes and is available for download here.
I made the below edit using it, but when I rendered it I turned off one side so you can see the difference:
• Source: /r/casualjiggles
For a reference, she had little bounce to begin with so I used lower values: [framesToGoBack] was 8 with a [shift] of 1. I also bumped up with Reach parameter to 120 (instead of the default 100) on the CC Smear to exaggerate it a bit more.
The 3 major changes:
The first is just an update to the masks and expressions that control some of the movement added by the Jiggle portion of the script. It only has an effect on the displacement map, which is mainly control by the Heftiness slider. Also, because it uses a circle, it could really only be used in single jiggle mode. Dual center mode still works, it just uses the older version of the displacement map masks.
Duplicate Frame Removal
The new tools show up under the tools tab! One is for removing duplicates frames that appear in a pattern, the other is for adding extra movement to a tracked point.
If you've ever worked with a video file from Gfycat, you may have noticed that there are duplicate frames. It depends on what file was originally uploaded, but Gfycat seems to only have a handful of frame rates it likes. So if you upload a file in 48fps it will encode it in 59.94fps with every fourth frame duplicated. I'm not sure if this is Gfycat or whatever tool people use to modify/upload the videos in. What the new tool does is ask you how often the pattern repeats and how many of those frames are duplicates:

The red frames would get dropped. The tool will then add an expression to the layer and drop a pattern of frames, in addition it will also change the composition's frame rate so the duration of your footage stays the same. In the time remapping expression there is a value right at the top that you may need to change. It starts at 0, but if you run this script and there are still duplicate frames, increase this value by 1 and see if the pattern matches then. Keep adding 1 until the duplicates are removed. This works on rounding, so it's possible the pattern may not match up on the first frame, which this little shift value adjusts the pattern's position.
Extra Bounce
This may turn into something more later. Here's the basic idea: What if you have a casual jiggle, but you want more jiggle?
That's basically what this does. If in After Effects you use a motion tracker to track let's say a nipple, then use this tool, you'll get a null layer that is effectively your track but with more bounce. You can then use that with a CC Smear effect to basically make more jiggle! It's actually pretty nice, I was surprised. It has 2 controls: How far back it needs to look and a shift control.
The "How far back it goes" is measured in frames and it's basically how many frames should be considered when guessing where the jiggle starts. A higher value of how far back it goes creates a much sloppier/smoother jiggle. A lower value creates a very tight/smaller extra jiggle.
The shift value is if you want it to look into the future, so a value of 1 represents looking a single frame ahead. 0 is the default. This is designed to add extra bounce, not pre-emptive bounce, but I guess you could do that if you wanted to.
One downside right now is this does not work well if the camera is moving a lot, it can handle a little but not too much.
 Update your looks just like you update your phone! Just hope there's no issues with the updates.
There was too much work to redraw everything - I am not an artist so that part took forever and still is pretty bad in parts. However, the animating was pretty solid. I rigged up the body and arm+phone using the new advanced puppet tool, which has the ability to "scale" a pin. This scaling makes it look almost like it's moving forwards and backwards in a scene, which is what I used on her hand and the phone to tilt it.
Almost everything was rigged to something else, so changes were pretty seamless. The biggest challenge was the phone display... since it has to move like the reverse facing camera would show. So after the phone was rigged, I used the position of it to move the Camera that was pointed to the little display comp. That entire composition was actually a 3D scene that moved correctly, it's very cool. The downside was because I didn't redraw tons of stuff, I couldn't move the camera very much so the effect is largely hidden because the movement is so minor.
I added a lot of stupid details, like the reflection of her face the phone because it's black, or her finger slightly lifts off the phone for a second which causes a tiny bit of rotation on the phone. Dumb stuff.
 I would guess even models get a bit jealous at times. Most just can't do anything about it.
I got a trial of AE 2019 to try out the Mocha plugin, it's much more stable and easy to use within AE. I was going to try and use content aware fill, but I realized I didn't want it to grab from surrounding areas so that was scrapped. What I ended up doing was creating frames to use as sources and then morphing according to the masks Mocha produced. Way more work then I set out to do.
So the left girl originally doesn't have a large chest (in case you can't tell), so those are edited in. The girl on the right did have a large chest, so I had to edit them out. As for the butts, both were big, so I had to edit them smaller in both cases, just at different times. Left had her's reduced, while right girl had her's un-reduced.
Pro-tip: Blogger doesn't host mp4 files like these, so they're already hosted on gfycat and imgur.

A small number of people have asked me how to edit video, so here we go! Again, I'm sorry it's more of a walkthrough than a tutorial or guide, but it beats having nothing.
The walkthrough is available on mega.nz: WALKTHROUGH VIDEO
Duration: 16 minutes
Size: 225MB
Or you can find all the walkthroughs here.
Description: I go over rotoscoping and the process I use for it. Then I go over using liquify on video and how to use the offset property on the liquify effect to help out. Then I got back and show how to use the Reshape Effect instead. Then I use the Jiggle Portion of the Jiggle and Grow script to add jiggles. I do this twice, using both modes: Force/Spring and Speed/Amount.
Below are the results.
• Source: Nicole Kopchak (BoutineLA) [reddit]
This is the expression I used on the null layer to get the average point of the mask:

Despite it's name, Walkthrough 1 isn't the easiest, it was just the first. The "Walkthrough Liquify" is the easiest. I realized this one was a bit harder than I wanted after I completed it, so I went back and made the Liquify walkthrough.
The walkthrough is available on mega.nz: WALKTHROUGH 1
Duration: 25 minutes
Size: 225MB
Or you can find all the walkthroughs here.
Description: The first thing I do here is color correct the image in Photoshop. Also, I add additional layers to the psd file so the breasts have more breathing room in the animation. In After Effects I use Reshape to control the size. I briefly show how to do this without the Jiggle and Grow script, but then also show how to use the script.
In addition, I then go over how to add shadows, which is where most of the time is spent. At the very end, I show exporting to an mp4 file and creating a gif.
Below are the results.
I'm sorry it's not really a tutorial, but it's better than nothing. It was the first one I did so I think I improved a tiny bit with the other two.

Been away for awhile, things change and take time to get used to. But over the passed couple weeks I've been making walkthroughs for the anyone to use. They're not the greatest in the world, but it's something.
The walkthrough is available on mega.nz: WALKTHROUGH LIQUIFY
Duration: 12 minutes
Size: 120MB
Or you can find all the walkthroughs here.
Description: This is the easiest way to make breast expansion morphs in After Effects. I make 3 different levels, just Liquify, Liquify with more effects, and then one that uses multiple layers/masks and Liquify effects. This is just default After Effects, so no script or anything complicated. This will even likely work with the "freely" available version of After Effects from CS2 - except the mask feathering points, but that's not too bad.
Below are the results.
I apologize for the text-to-speech, but it's not too bad. There will be 2 more walkthroughs released shortly.
Go forth and please make things.
 It's not that subtle, but their size kind of sneaks up on you.
Editing out a large portion of the frame wasn't super fun, but it works.